How To Photograph Food For An Editorial
A practical step-by-step guide to how to photograph food for an editorial, including preparation, instructions, common issues, tips, and next steps.
How To Photograph Food For An Editorial
This guide explains how to approach how to photograph food for an editorial, including the preparation, practical steps, common mistakes, and final checks that help you finish with confidence.
Before You Start how to photograph food for an editorial
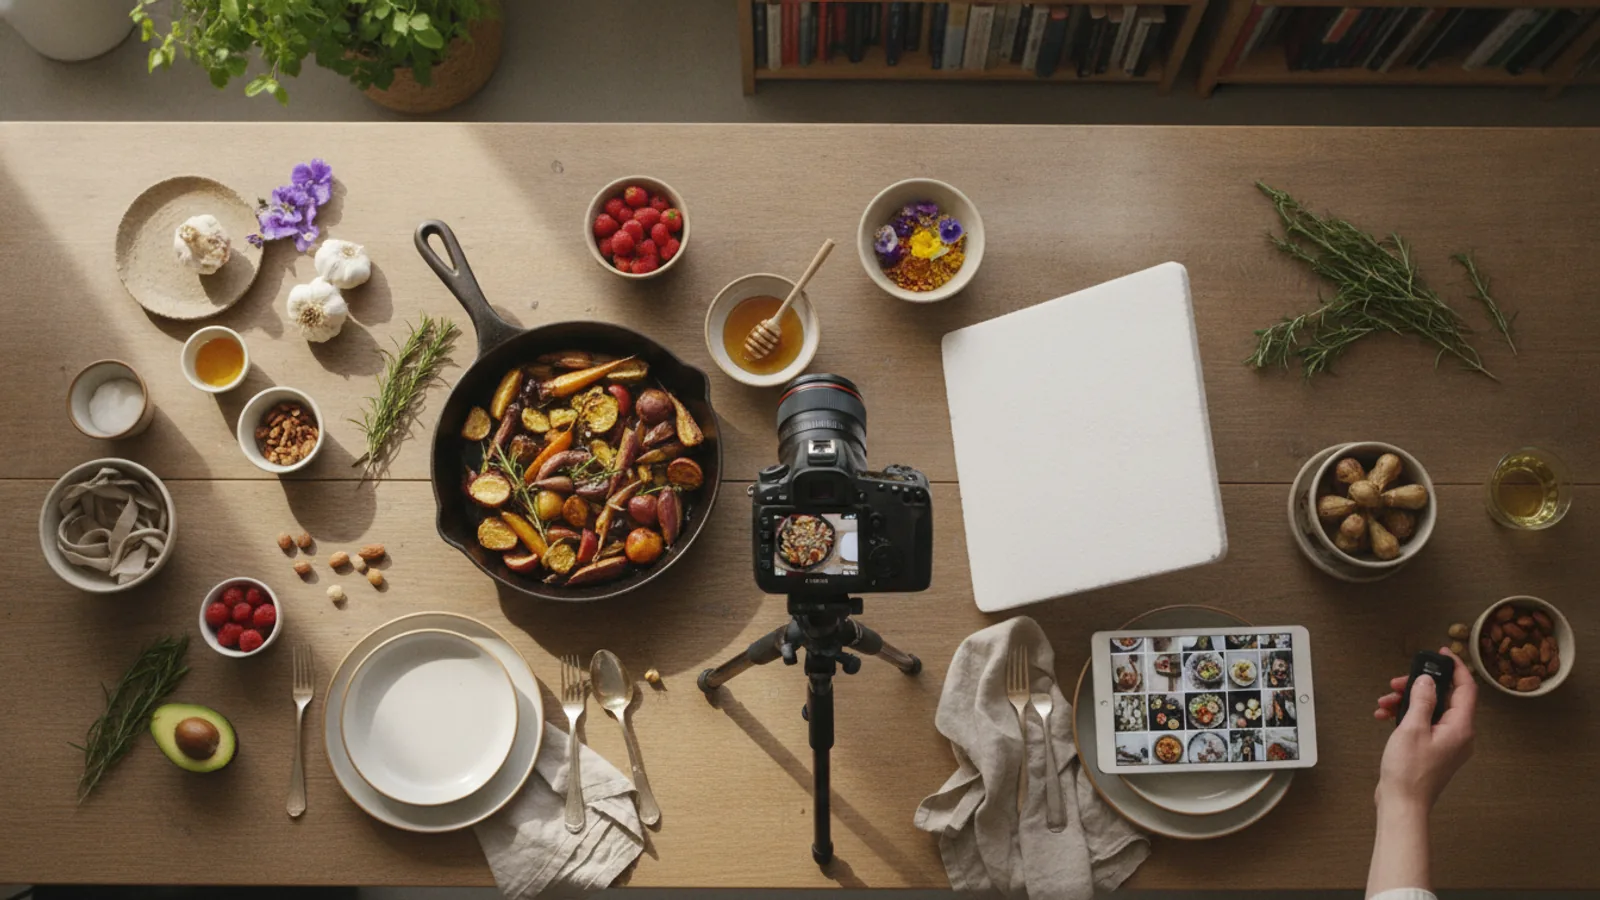
Before you even pick up your camera, a good foundation is essential for successful editorial food photography. Preparing your space, understanding your assignment, and having the right tools ready will save you time and prevent common issues.
What You Need
Safety, Timing, or Context Checks
Understanding the context of your editorial shoot is crucial for delivering photos that meet the publication's needs and expectations.
Step-by-Step Instructions
Quick Reference
Common Problems When You Photograph Food For An Editorial
Even with careful planning, you might encounter some common challenges when photographing food for editorial purposes. Here are some frequent issues and practical ways to fix them:
Harsh Shadows and Overexposed Highlights
Problem: Your food photos have very dark, distinct shadows or areas that are completely blown out (too bright with no detail). This often happens with direct, undiffused light.
Fix: Always use a diffuser between your light source (especially a window) and your food to soften the light. On the opposite side of your light, place a white reflector (like a foam core board) to bounce light back into the shadowed areas, lifting them gently. If highlights are still too bright, try moving your setup further from the window or using a sheer curtain to block some light.
Dull or Unappetizing Looking Food
Problem: The dish looks flat, lifeless, or just doesn't appear as fresh and appealing as it should.
Fix: This often comes down to timing, ingredients, and subtle styling. Use the freshest ingredients possible. Cook and plate the food just before shooting. For cooked items, a tiny brush of oil or water can add a natural sheen. For fresh produce like fruits and vegetables, a light mist of water from a spray bottle makes them look dewy. Ensure your white balance is correct so colors aren't muted or off-tone.
Distracting Backgrounds or Overwhelming Props
Problem: The eye is drawn away from the food because of cluttered backgrounds, shiny props, or too many elements in the frame.
Fix: Simplify your scene. Choose neutral, matte-finish backgrounds and plates that don't compete with the food. Use a wide aperture (low f-number) to create a shallow depth of field, blurring the background and making the food sharply stand out. Carefully select only 1-3 props that truly enhance the story and mood, rather than adding clutter.
Incorrect White Balance Leading to Odd Colors
Problem: Your white plates look yellow or blue, and the food colors appear unnatural or unappetizing.
Fix: Set your camera's white balance manually to match your light source. If shooting under a window, try the "Daylight" or "Shade" preset. Even better, take a custom white balance reading using a gray card. In post-processing, use the white balance adjustment tools to neutralize any color casts, ensuring whites are true white and food colors are accurate.
Blurry Photos or Missed Focus
Problem: Parts of or the entire image is out of focus, making the food look soft and unprofessional.
Fix: Always use a sturdy tripod to eliminate camera shake. When using a wide aperture, focus precisely on the most important part of the dish (e.g., the front edge, a key ingredient). Use your camera's magnify feature in Live View mode to zoom in and manually focus with extreme accuracy. Ensure your shutter speed is fast enough if you're hand-holding or if there's any slight movement (like steam), though on a tripod, slower speeds are fine.
Advanced Tips for How To Photograph Food For An Editorial
Once you've mastered the basics, these advanced techniques can elevate your editorial food photography, giving your images a more polished and unique look.
Mastering the Art of Storytelling with Props
Don't just use props; let them tell a story. Think about what narrative you want to convey. If it's a breakfast editorial, a half-eaten piece of toast or a smeared jam jar can suggest real life. Crumpled linen napkins, strategically placed crumbs, or a well-worn cutting board can evoke a sense of authenticity and home. Use subtle human elements like a hand reaching for a plate (without showing the face) to add a personal touch and invite the viewer into the scene.
Playing with Texture and Layers
Great food photography often highlights texture. Use light that skims across the surface of the food (often called "raking light" or "backlight") to emphasize crusts, sprinkles, and rough surfaces. Compose your shot to create layers – foreground elements (e.g., a blurred fork), the main subject (food), and a background that adds depth without distracting. This layering adds visual interest and a sense of three-dimensionality.
The "Hero" Shot and Dynamic Composition
Identify the most appealing part of your dish and make it the "hero." Position it strategically using the rule of thirds or other compositional guidelines. Experiment with dynamic compositions, such as leading lines (e.g., the line of cutlery or a baguette) that guide the viewer's eye through the image, or using negative space effectively to make your subject stand out powerfully.
Utilizing Artificial Light for Control
While natural light is often preferred, understanding artificial light opens up new possibilities, especially when natural light is inconsistent or unavailable. Invest in a continuous LED light panel or a studio strobe. The key is to mimic the soft quality of natural window light using large softboxes or diffusers. Learn about light ratios and feathering light to create natural-looking shadows and highlights. This gives you complete control over your lighting, regardless of the time of day or weather.
Advanced Post-Processing Techniques
Move beyond basic adjustments to fine-tune your images. Learn about local adjustments in Lightroom or Capture One to selectively brighten, darken, or enhance specific parts of the food. Explore color grading to unify the mood and aesthetic of your entire editorial set. Use split toning to add subtle color to highlights and shadows, further enhancing the desired atmosphere. Practice precise cloning and healing to remove even the most minute imperfections without making the image look artificial.
Working with Steam and Movement
For hot dishes, capturing steam can add incredible warmth and realism. Position your light source behind the dish so the steam is backlit, making it more visible. You'll need a slightly faster shutter speed to freeze the steam effectively. For subtle movement, like a drizzle of sauce or a sprinkle of herbs, work quickly, use continuous shooting mode, and a fast shutter speed to capture the perfect moment.
How To Photograph Food For An Editorial FAQ
What's the best lens for editorial food photography?
For versatility, a 50mm prime lens (f/1.8 or f/1.4) is excellent for its wide aperture, which creates beautiful background blur. For intricate close-up shots that highlight textures and fine details, a 100mm or 105mm macro lens is ideal. Many professionals use a combination of both.
Should I use natural or artificial light for food editorials?
Natural light is generally preferred for editorial food photography because it often looks soft, flattering, and authentic. It creates a beautiful, diffused quality that is hard to perfectly replicate with artificial lights without proper modifiers. However, if natural light is inconsistent or unavailable, artificial lighting (with large diffusers and softboxes) can provide consistent, controlled results.
How do I make food look fresh and appetizing during a long shoot?
Preparation and timing are key. Cook and plate the food as close to the shooting time as possible. Use fresh, high-quality ingredients. Keep a spray bottle with water handy to mist fresh produce for a dewy look. A tiny brush of olive oil can add a sheen to cooked meats or vegetables. For items that wilt (like salads) or melt (like ice cream), have backups or prepare them in stages.
What camera settings are best for photographing food?
For most editorial food photography, shoot in Manual mode. Use a low ISO (100 or 200) for image clarity. Your aperture (f-stop) will vary: a wider aperture (e.g., f/2.8 to f/5.6) creates a blurry background (shallow depth of field), while a narrower aperture (e.g., f/8 to f/11) keeps more of the dish in focus, especially for overhead shots. Adjust your shutter speed to achieve correct exposure, especially when using a tripod where shake isn't an issue. Always ensure your white balance is accurate.
How important is post-processing for editorial food photos?
Extremely important. Post-processing is where you refine your images to meet editorial standards. It involves adjusting exposure, contrast, white balance, sharpness, and cropping to perfection. It's also where you can clean up any minor imperfections and ensure a consistent style across all images in a series. Think of it as the final polish that makes your photos ready for publication.
Final Checklist for How To Photograph Food For An Editorial
Use this checklist to ensure you've covered all the essential steps for your editorial food photography project.
- ✓ Understand the Editorial Brief: Fully grasped the story, mood, and technical requirements?
- ✓ Plan and Sketch: Have a clear idea of your compositions and prop placements?
- ✓ Gather All Props: Selected and cleaned all plates, cutlery, backgrounds, and styling tools?
- ✓ Secure Fresh Ingredients: Have all food items ready, ensuring they are fresh and high-quality?
- ✓ Set Up Lighting: Established soft, natural light (or artificial equivalent) with diffusers and reflectors?
- ✓ Camera on Tripod: Is your camera mounted securely for sharp, consistent shots?
- ✓ Clean and Style Food: Plated the dish appealingly, wiped edges, and added subtle styling touches?
- ✓ Check Camera Settings: Confirmed aperture, ISO, shutter speed, and white balance are appropriate?
- ✓ Shoot Tethered (if possible): Reviewing images on a larger screen for immediate feedback?
- ✓ Capture Various Angles: Taken hero shots, detail shots, and alternative compositions?
- ✓ Perform Basic Clean-up: Wiped away any visible drips or crumbs during the shoot?
- ✓ Select Best Images: Chosen the strongest images for post-processing?
- ✓ Edit Professionally: Adjusted exposure, white balance, contrast, and sharpened without overdoing it?
- ✓ Remove Imperfections: Cloned out any dust, spots, or unwanted distractions?
- ✓ Export Correctly: Saved images in the required file type, resolution, and color space for the editorial?